
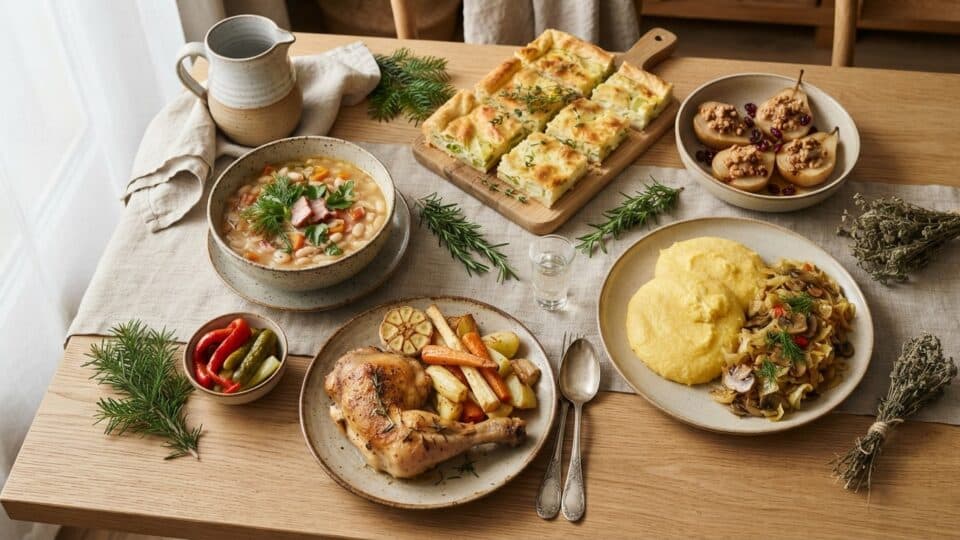
Winter recipes that can genuinely be made at home, without hard-to-find ingredients: we have selected five different dishes for cold days—white bean and tarragon soup, chicken thighs with root vegetables, braised cabbage with mushrooms and mămăligă, a leek and potato pie, and baked pears with walnuts. Each recipe includes quantities, portions, approximate timings, preparation steps, cues for checking the result and practical variations. Times depend on the size of the ingredients and the equipment used; checking texture and temperature matters more than watching the clock.
5 winter recipes at a glance
You can make the dishes individually or combine them into a weekend menu. The recipes do not assume that every course is prepared at the same time. Timings are estimated for a standard home kitchen and may vary with quantities, appliances and experience.
| Dish | Servings | Approximate total time | Type |
|---|---|---|---|
| White bean and tarragon soup | 4–5 | 45 min | Fasting / vegan |
| Oven-baked chicken with root vegetables | 4 | 65–75 min | Meat |
| Cabbage with mushrooms and mămăligă | 4 | 60 min | Vegan |
| Leek, potato and cheese pie | 6 slices | 65–75 min | Vegetarian |
| Baked pears with walnuts | 4 | 35–40 min | Dessert |
Choosing seasonal ingredients without overcomplicating the menu
In winter, cabbage, carrots, parsnips, potatoes, leeks, tinned legumes, walnuts and fruit that stores well can form the basis of varied, filling dishes. There is no need to cook with unusual products or buy every ingredient in large amounts. Choose firm vegetables with no spoiled areas, and check canned goods for their use-by date and intact packaging.
One practical advantage is that ingredients can be reused: onions, carrots and parsnips appear in several dishes, while the oven can be used for the main course and then for dessert. The recipes are indicative and can be adjusted; they do not present price estimates as prices valid in every shop in Romania.
Winter recipe #1 — White bean and tarragon soup with root vegetables
Recipe details: 4–5 servings · 15 minutes’ preparation · 30 minutes’ cooking · about 45 minutes in total · no animal products.
An aromatic soup for cold days, built around already cooked beans and seasonal vegetables. We use ready-to-eat tinned beans to keep preparation time predictable and avoid confusion between dried beans and beans that have already been heat-treated. Tarragon is added near the end for a fresh flavour, while acidity is adjusted to taste.
Ingredients and exact quantities
| Ingredient | Quantity |
|---|---|
| Tinned white beans, drained and rinsed | 460–500 g (usually two 400 g tins) |
| Yellow onion | 150 g (one large onion) |
| Carrots | 180 g (two small carrots) |
| Parsnip | 80 g |
| Kapia pepper / red pepper | 140 g |
| Tinned diced tomatoes | 200 g |
| Sunflower or olive oil | 30 ml |
| Water or low-salt vegetable stock | 1.2 litres |
| Bay leaves | 2 |
| Dried tarragon | 1 tsp (or 1 tbsp fresh) |
| Lemon juice | 15–25 ml, to taste |
| Salt, pepper, parsley | Start with 4 g salt, then adjust; 10 g parsley |
Step-by-step method
Step 1 — Prepare the base. Finely chop the onion; dice the carrots and parsnip into roughly 1 cm pieces; cut the pepper into short strips. Rinse the tinned beans in a colander. If using salted vegetable stock, reduce the initial amount of salt.
Step 2 — Soften without burning. Heat the 30 ml oil in a 3–4 litre pot. Add the onion and carrot and cook over medium heat for about 5–6 minutes, stirring. Add the parsnip and pepper for another two minutes. The vegetables should soften slightly, not brown deeply.
Step 3 — Cook the root vegetables. Add 1.2 litres of liquid and the tomatoes, then add the bay leaves and simmer without a vigorous boil for 15–18 minutes, until the parsnip and carrot are cooked. Test a piece with a fork: it should be tender but retain its shape.
Step 4 — Add the beans. Add the cooked beans and continue for 8–10 minutes. For a slightly thicker soup, crush about 80–100 g of beans directly in the pot with the back of a spoon, without flour or a flour-and-fat roux. Do not overcook the beans, as they may disintegrate.
Step 5 — Adjust the seasoning. Turn off the heat, remove the bay leaves and gradually add the tarragon, parsley and lemon juice. Taste before adding more salt. Leave covered for five minutes to let the flavours settle, then serve hot.
Tips, variations and the intended result
What makes it flavourful: briefly softening the vegetables before adding liquid, thoroughly rinsed beans, and tarragon added near the end. For a heartier version, add 150 g diced potato with the root vegetables and increase the liquid by 100–150 ml. For a gluten-free version, check the label on concentrated stock and seasonings.
The intended result: a soup texture with tender vegetables and whole beans, lightly thickened rather than a dense purée. If it is too acidic, add a little liquid and taste again; if it is too watery, crush another spoonful of beans.
Food safety and cautions
A note on dried beans: the amount in this recipe refers to cooked, tinned beans. Kidney beans or other dried beans should not be added raw to a quickly simmered soup. Health Canada explains the risk posed by lectins in some dried beans and the need for soaking and vigorous boiling; tinned beans have already been heat-treated.
Winter recipe #2 — Oven-baked chicken thighs with potatoes and root vegetables
Recipe details: 4 servings · 20 minutes’ preparation · 45–55 minutes’ baking · 65–75 minutes in total · one dish.
An oven dish in which the vegetables absorb the seasonings and brown alongside the chicken. The potatoes should be cut into similarly sized pieces, and the thighs placed on top, not fully covered by vegetables. The aim is a browned exterior and an interior that is safe to eat, without undercooked meat.
Ingredients and exact quantities
| Ingredient | Quantity |
|---|---|
| Bone-in chicken thighs | 4, about 900–1,100 g in total |
| Potatoes | 600 g |
| Carrots | 250 g |
| Parsnip | 250 g |
| Red onion | 150 g |
| Oil | 30 ml |
| Standard mustard | 10 g |
| Garlic | 3 cloves |
| Dried thyme | 1 tsp |
| Sweet paprika | 1 tsp |
| Salt and pepper | About 8 g salt for the entire dish, then to taste |
| Water | 60 ml, only at the base of the baking tray if needed |
Step-by-step method
Step 1 — Preheat and prepare the tray. Heat the oven to 200°C conventional (or about 190°C fan, adjusted for your appliance). Cut the potatoes into 2–3 cm pieces, the carrots and parsnips into roughly 2 cm sections, and the onion into quarters. Use a tray large enough for the vegetables to sit in one layer.
Step 2 — Season the vegetables. Toss the vegetables with about half the oil, a pinch of salt, pepper and some of the thyme. Spread them over the tray. If the dish is small and the ingredients are crowded, use two trays: otherwise the vegetables will steam in their juices rather than brown.
Step 3 — Prepare the chicken separately. Pat the chicken thighs dry with kitchen paper; do not wash them under running water. Mix the remaining oil, mustard, crushed garlic, paprika, thyme and the remaining salt. Coat the thighs all over, using a separate bowl from the prepared vegetables to avoid cross-contamination.
Step 4 — Bake and check. Place the thighs skin-side up over or among the vegetables. Bake for an estimated 45–55 minutes. Halfway through, turn only the vegetables with a spatula, without excessively piercing the meat. If the tray dries out before the vegetables are cooked, add 60 ml water to its base, not over the skin.
Step 5 — Confirm the temperature and rest. Measure at the thickest part of the meat, without the thermometer touching bone: the chicken must reach at least 74°C internally. The colour of the juices and a golden crust are not sufficiently safe indicators. Rest for 5–8 minutes before serving. If the vegetables are ready before the chicken, remove them and keep them safely while the meat finishes cooking.
Tips, variations and the intended result
For crisp skin: dry it before seasoning and avoid crowding the pieces. For tender vegetables: cut the parsnip and potatoes into similarly sized pieces; pieces that are too large will remain raw when the chicken is done. Variation: replace half the potatoes with butternut squash, but check the tray 10 minutes earlier, as some varieties soften quickly.
The intended result: thighs with fully cooked meat and potatoes that break apart easily when pierced with a fork. If the skin has not browned, you can use the grill only after the centre has reached the safe temperature, watching closely for 2–3 minutes.
Food safety and cautions
The FDA gives 74°C / 165°F as the minimum internal temperature for all parts of poultry. Wash hands, knives and surfaces that have touched raw chicken before using them for ready-to-eat ingredients. Do not pour leftover marinade from the bowl that held raw meat over the baked dish.
Winter recipe #3 — Braised cabbage with mushrooms and mămăligă
Recipe details: 4 servings · 15 minutes’ preparation · 40–45 minutes’ cooking · about 60 minutes in total · vegetarian / vegan.
Sweet cabbage and mushrooms make an accessible winter main dish with a full flavour that needs no meat. The key is to brown the mushrooms first and let the cabbage lose some of its water before adding a little liquid. The mămăligă, a Romanian cornmeal porridge, is made separately and can be timed for the final 15–20 minutes of the cabbage.
Ingredients and exact quantities
| Ingredient | Quantity |
|---|---|
| White cabbage, cored | 900 g |
| Brown or white button mushrooms | 350 g |
| Onion | 160 g |
| Tomato paste | 25 g |
| Oil | 35 ml |
| Water for the cabbage | 120 ml |
| Sweet or smoked paprika | 1 tsp |
| Bay leaf | 1 |
| Ground caraway (optional) | ¼ tsp |
| Cornmeal for mămăligă | 220 g |
| Water for mămăligă | 850 ml |
| Salt, pepper, dill | About 7–8 g salt in total, plus pepper and 10 g dill |
Step-by-step method
Step 1 — Slice and prepare. Remove the cabbage core and thinly shred the leaves. Slice the mushrooms and chop the onion. Do not wash the mushrooms under a prolonged running tap; clean them and pat them dry if very damp so that they can brown.
Step 2 — Brown the mushrooms. Put 15 ml oil and the mushrooms into a wide frying pan or large casserole. Cook over medium-high heat for 7–9 minutes, until their released liquid has reduced and their edges take on colour. Transfer them temporarily to a clean bowl.
Step 3 — Soften the cabbage. Add the remaining oil and onion to the same pan; cook for 4 minutes. Add the cabbage in two batches and stir for 5–7 minutes, until its volume reduces. Add the tomato paste, paprika, bay leaf and 120 ml water. Partially cover and simmer on low heat for about 18–22 minutes, stirring occasionally.
Step 4 — Finish the flavouring. When the cabbage is almost tender, add the browned mushrooms, salt, pepper and optional caraway. Cook uncovered for another 6–8 minutes so excess water evaporates. Taste: the cabbage should be soft but not reduced to a paste, and the mushrooms should retain their pieces.
Step 5 — Make the mămăligă. During the final 15–20 minutes, bring 850 ml water with a little salt to the boil. Gradually sprinkle in 220 g cornmeal, stirring continuously with a whisk or wooden spoon. Cook over low heat according to the grind and the product instructions, approximately 12–20 minutes, until the cornmeal is fully hydrated. Serve immediately with the cabbage and dill.
Tips, variations and the intended result
For a deeper flavour: brown the mushrooms rather than cooking them directly with the cabbage. Variation with sauerkraut: this requires recalculating the salt and usually adjusting the water and cooking time; do not substitute the amount without tasting. Fasting version: the formula described contains no animal products, but check the ingredients of commercially sold tomato paste and seasonings.
The intended result: tender, lightly caramelised cabbage with the flavour of browned mushrooms, served with creamy mămăligă. If the cabbage is still firm, add another 30–50 ml water and cook for 5–10 minutes; do not abruptly raise the heat.
Food safety and cautions
Keep raw cabbage and mushrooms separate from raw meat. Cool leftovers quickly in small portions. If preparing mămăligă for the following day, refrigerate it and reheat the portion until uniformly hot, with no cold sections.
Winter recipe #4 — Savoury leek, potato and cheese pie
Recipe details: 6 slices · 25 minutes’ preparation · 35–40 minutes’ baking · about 65–75 minutes in total.
A savoury pie for a winter lunch or dinner when leeks and potatoes are at hand. It combines partly boiled potatoes with leeks softened in butter, a little telemea—a salty Romanian brined cheese—and a crisp puff-pastry layer. Do not fill the pastry with hot ingredients: excess steam can leave the base soggy.
Ingredients and exact quantities
| Ingredient | Quantity |
|---|---|
| Plain chilled puff pastry | 400 g, two sheets or one sheet large enough for a base and lid |
| Cleaned leeks | 300 g |
| Peeled potatoes | 350 g |
| Cow’s-milk telemea | 150 g |
| Eggs | 2 (one for the filling, one for glazing) |
| Thick plain / Greek yoghurt | 60 g |
| Butter | 20 g |
| Dill or parsley | 10 g |
| Black pepper, nutmeg (optional) | To taste |
| Salt | Only if the cheese is not salty enough |
Step-by-step method
Step 1 — Prepare the potatoes. Cut the 350 g potatoes into roughly 1 cm cubes. Put them in gently boiling water and cook for 8–10 minutes, until almost tender but not falling apart. Drain thoroughly and leave for several minutes to release steam.
Step 2 — Soften the leeks. Cut the leeks into thin rounds and wash carefully between the layers to remove grit. Melt 20 g butter in a frying pan and cook the leeks over moderate heat for 7–9 minutes, without burning them. Leave to cool until no longer hot.
Step 3 — Mix the filling. In a bowl, combine the potatoes, leeks, crumbled telemea, 60 g yoghurt, one egg and the herbs. Add pepper and, if desired, a pinch of nutmeg. Do not add salt before tasting the cheese. The mixture should hold together, not be watery.
Step 4 — Assemble the pie. Heat the oven to 190°C conventional (about 180°C fan, depending on the oven). Line a roughly 20 × 25 cm tin. Lay half the puff pastry as the base, leaving a 1–2 cm edge, spread in the cooled filling and cover with the second sheet. Seal the edges and cut two or three small vents in the lid.
Step 5 — Bake through. Brush the top with the second beaten egg. Bake for an estimated 35–40 minutes, until the pastry is golden and firm, including around the edges, and the filling is cooked through and well set. If the top browns too quickly, loosely cover with foil after the pastry has set its shape. Leave for 10–15 minutes to settle before slicing.
Tips, variations and the intended result
Crisp pastry: use cooled ingredients, a well-drained filling and a preheated oven. Less salty: use half telemea and half well-drained fresh cheese, but adjust if the texture becomes wetter. Serving: cut into six slices and serve with roasted beetroot salad or pickles, as preferred.
The intended result: a golden, crisp lid and a soft but set filling, with discernible pieces of potato. If the base remains too wet, cool the filling completely next time and drain the leeks and potatoes more thoroughly.
Food safety and cautions
The recipe contains wheat/gluten, milk and eggs. For food safety, the egg in the filling must be fully cooked: the centre of the pie should not be liquid. If using a thermometer in an egg-based filling, the FDA indicates approximately 71°C / 160°F for egg dishes.
Winter recipe #5 — Baked pears with walnuts, oats and cinnamon
Recipe details: 4 servings · 10 minutes’ preparation · 22–30 minutes’ baking · about 35–40 minutes in total.
A simple cold-weather dessert without pastry, made with baked pears and a walnut-and-oat topping. Use ripe but still firm pears that can be cut without collapsing. Honey is optional: well-chosen fruit is often sweet enough, and the sugar in the filling can be adapted to taste.
Ingredients and exact quantities
| Ingredient | Quantity |
|---|---|
| Medium pears, ripe but firm | 4 (about 700 g) |
| Chopped walnuts | 70 g |
| Rolled oats | 45 g |
| Melted butter or neutral vegetable oil | 25 g butter / 25 ml oil (choose one) |
| Honey (optional) | 20 g |
| Ground cinnamon | 1 tsp |
| Lemon juice | 15 ml |
| Water for the baking dish | 40 ml |
| Plain yoghurt for serving (optional) | 4 tbsp, added only after baking |
Step-by-step method
Step 1 — Prepare the fruit. Preheat the oven to 180°C conventional. Wash the pears, halve them lengthways and use a teaspoon to remove the core and seeds, creating a small hollow. Leave the skin on if it is clean and sound: it helps the fruit retain its shape.
Step 2 — Make the topping. In a bowl, mix the walnuts, oats, cinnamon, melted butter or oil, and optional honey. The mixture should be slightly moist and crumbly, not a runny paste. If the pears are already very sweet, omit the honey entirely.
Step 3 — Arrange in the dish. Brush the cut surfaces of the pears with a little lemon juice, then place them cut-side up in a small baking dish. Divide the topping between the hollows and scatter a little over the surface. Pour the 40 ml water only into the bottom of the dish, not over the topping.
Step 4 — Bake and check the texture. Bake for an estimated 22–30 minutes. The pears should be easily pierced with the tip of a knife but should not turn into purée. If the topping begins to brown too much before the fruit is ready, loosely cover with foil for the remaining time.
Step 5 — Serve. Rest the dessert for 5–10 minutes after taking it out of the oven. Serve two halves per portion, plain or with a spoonful of cold yoghurt. Do not add the yoghurt before baking. For a neat presentation, sprinkle with a very small amount of cinnamon after the fruit has cooled slightly.
Tips, variations and the intended result
With very firm pears: add 5–10 minutes of baking time, checking at short intervals. Without honey: the dessert remains aromatic if the pears are ripe. Without butter: use the oil in the stated quantity. Allergen note: walnuts are a major allergen; people who need to avoid gluten may need to check the oat label.
The intended result: soft but intact pears, with a crisp topping and cinnamon aroma. For a dessert with a richer filling, add 10 g extra walnuts without increasing the honey proportionately.
Food safety and cautions
Honey should not be given to children under one year old, in line with general paediatric guidance. The prepared, cooled dessert should be refrigerated if it will not be eaten soon; if serving with yoghurt, add it to each plate rather than the container used for storage.
Shopping list for all five recipes
If you want to make each recipe once, the list below consolidates the main quantities. It does not mean that all dishes must be cooked on the same day; store raw and cooked food in line with labelling and food-safety guidance.
| Category | What to buy, approximately |
|---|---|
| Vegetables | 1 kg potatoes, 500 g onions, 450 g carrots, 350 g parsnips, 900 g cabbage, 350 g mushrooms, 300 g leeks, 150 g peppers, garlic |
| Fruit and herbs | 4 pears, 1 lemon, tarragon, thyme, dill, parsley, bay leaves |
| Tinned and dry goods | 2 × 400 g tins white beans, 200 g tinned tomatoes, 25 g tomato paste, 220 g cornmeal, 45 g oats, 70 g walnuts |
| Meat, dairy, eggs and pastry | 4 chicken thighs (900–1,100 g), 400 g puff pastry, 150 g telemea, 60 g yoghurt, 2 eggs, about 45 g butter |
| Seasonings and cupboard staples | About 100 ml oil for the savoury dishes, mustard, salt, pepper, paprika, cinnamon; optional honey |
How to organise weekend cooking efficiently
Start by cleaning and portioning all vegetables on clean chopping boards. Keep those for the soup separate from vegetables intended for raw meat. You can make the soup while the chicken bakes, but only if you use separate spaces and utensils for raw meat. For the cabbage, brown the mushrooms first, then make the mămăligă just before serving; the pie can bake in another oven session to keep its base crisp.
For dessert, the pears can go into the oven after the main course, once the temperature has been reduced to 180°C. Do not leave cooked dishes at room temperature for hours on the assumption that they will all go into the fridge at the end. Portion leftovers promptly and cool them quickly.
How to store and reheat dishes safely
According to FoodSafety.gov, perishable food should be refrigerated within two hours of cooking or serving, and the refrigerator should be kept at 4°C or below. Use shallow, portioned containers for even cooling. Cooked leftovers should generally be eaten within 3–4 days if they have been cooled and stored correctly; freeze them for longer storage. USDA FSIS explains these limits.
When reheating, aim for an internal temperature of around 74°C for leftovers that need heating, stirring soups and stews to avoid cold spots. Bring soup and sauces to a boil during reheating. Do not confuse the storage life of a raw ingredient with that of the finished dish. If food has stood too long at room temperature, reheating alone does not guarantee that it is safe.
Allergens and substitutions: what to watch for
The leek pie contains wheat, milk and eggs, while the pear dessert contains walnuts and may contain milk if butter or yoghurt is used. The mustard in the chicken recipe is a relevant allergen. People with allergies should check labels, compound ingredients and the potential for cross-contamination. Substitutions can change cooking time and texture; do not assume nutritional or culinary equivalence without testing.
The bean soup and cabbage with mushrooms are presented without animal products; for vegan or gluten-free diets, check labels for the vegetable stock, seasonings and other packaged products. For young children, adapt piece size and texture; whole nuts or large pieces should not be offered to children at risk of choking.
Frequently asked questions about winter recipes
Can I make the soup with dried beans? Yes, but they require soaking and fully cooking separately, with specific safety rules, so the 45-minute time does not apply. Can I replace the thighs with chicken breast? Yes, but the timing will change and the minimum internal temperature of 74°C must be checked. Can the cabbage be made without mămăligă? Yes, but this changes the composition of the meal and the number of portions.
Is the pie good cold? Yes, provided it has been prepared and refrigerated correctly; it should not be left on the table for hours. Can I leave out the honey in the pears? Yes, particularly if the fruit is sweet enough. Can I cook in advance? Yes: promptly cool and refrigerate leftovers, separating portions to be eaten later. Is there an exact cost for all the ingredients? Not without current prices, retail pack sizes and the chosen shop; the list helps with preparing a personal budget.
More recipes and cooking guides on InfoBuz
For anyone wishing to prepare portions in advance, the guide Cook once, eat for three days explains meal organisation. For more Romanian dishes, read 15 reimagined traditional Romanian recipes. For a dessert similar to the pear recipe, see also baked apples with oats and walnuts.
Sources and editorial methodology
The recipes and quantities are original InfoBuz editorial formulas, prepared for home use rather than reproductions of a single commercial recipe. Timings are indicative and depend on the oven, cookware, ingredient size and foods used. We do not claim that each of the five dishes was physically tested in an InfoBuz kitchen. Guidance on safe temperatures for poultry and egg dishes was checked against FDA – Safe Food Handling, and leftover storage against FoodSafety.gov – 4 Steps to Food Safety and USDA FSIS.
For dried beans and lectins, we used Health Canada – Lectins in Dry Legumes. This evergreen article was written and editorially checked on 22 November 2026. For guidance tailored to severe allergies or special nutritional needs, consult a specialist.





Discuția cititorilor
Ai o opinie sau o întrebare despre acest articol? Spune-ne ce crezi.
Fii primul care deschide discuția.
Te rugăm să păstrezi un limbaj civilizat și să discuți la subiect. Comentariile spam sunt filtrate automat.