
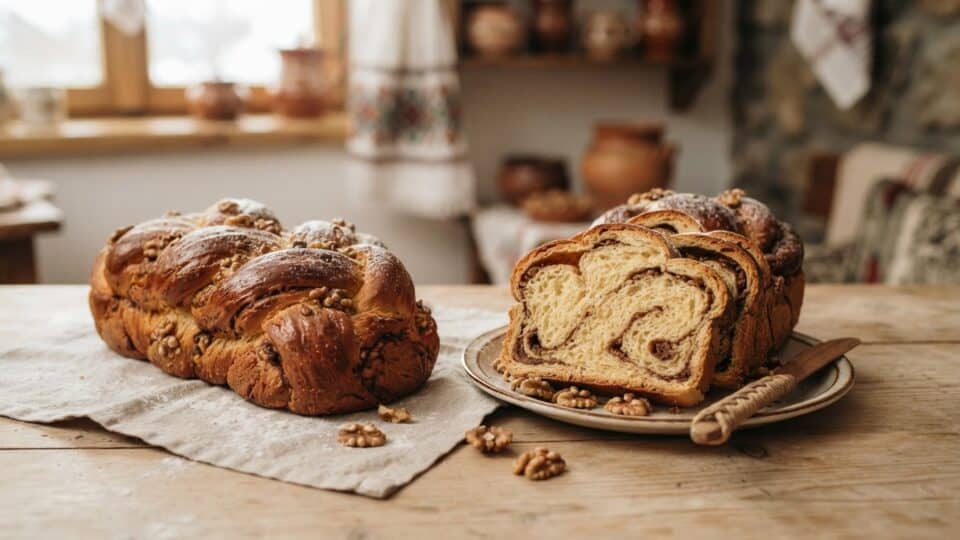
Fluffy walnut and cocoa cozonac is not simply a matter of using plenty of yeast. The key to a soft, pull-apart crumb lies in the right flour, gluten development, when the butter is incorporated, controlled proofing and thorough baking. This InfoBuz guide provides quantities for two loaves, steps in chronological order, temperatures and explanations for common problems, without suggesting that the same timing will work in every kitchen.
Fluffy cozonac: quick recipe guide
This recipe makes two walnut and cocoa cozonac loaves, baked in tins approximately 28–30 cm long, 10–11 cm wide and 8–9 cm high. Active preparation takes an estimated 45–60 minutes, plus two proofing stages and baking. Allow about 4–6 hours, with variations depending on dough temperature and yeast activity.
Initial oven setting: 170°C, conventional top-and-bottom heat, or about 160°C fan-assisted, unless the manufacturer advises otherwise. The estimated baking time is 45–55 minutes for these two tins; sometimes more time will be needed. More important than the exact minute is that the dough itself, rather than only the filling layer, is thoroughly baked at the centre.
Exact dough ingredients for two cozonac loaves
Prepare 800 g white wheat flour suitable for yeasted doughs, preferably with around 11–13% protein; 330 ml whole milk; 4 egg yolks (about 70–80 g); 150 g sugar; 130 g unsalted butter, softened but not melted; 12 g instant yeast or 35 g fresh yeast; 12 g salt; finely grated zest of one thoroughly washed lemon and, optionally, half an orange; and 2 teaspoons vanilla extract.
The milk quantity is for the dough and does not include the filling. Do not use both types of yeast at the same time. If the flour absorbs liquid differently, adjust with about 10–20 ml additional milk, added gradually, but only after several minutes of kneading. Use scales; do not equate “a cup of flour” with a fixed quantity in grams.
Walnut and cocoa filling ingredients
For both tins: 300 g medium-finely ground walnuts; 95 g sugar; 25 g unsweetened cocoa powder; 110 ml warmed milk; and vanilla or a small amount of rum flavouring, to taste. For brushing before baking: 1 egg beaten with 10 ml milk. If desired, sprinkle a little sugar over the surface, though this is not essential.
The filling should make a thick, spreadable paste that does not run off a spoon. Very finely ground walnuts may absorb milk differently from coarsely chopped walnuts; if the paste remains crumbly, add 1–2 teaspoons of milk. If it is too soft, correct it with a little more ground walnut. Let it cool completely before shaping the loaves.
Ingredient quantities table
The list separates ingredients for the crumb, filling and egg wash. This prevents accidentally using all the milk in the dough or all the sugar in the filling, and keeps the proportion between the two loaves consistent.
Optional ingredients, such as orange zest or rum flavouring, do not materially alter the main formula’s flour-to-liquid ratio. For one half-size cozonac, halve every quantity and use one tin.
| Component | Ingredient | Quantity |
|---|---|---|
| Dough | White wheat flour | 800 g |
| Dough | Whole milk | 330 ml |
| Dough | Egg yolks | 4 (70–80 g) |
| Dough | Sugar | 150 g |
| Dough | Unsalted butter | 130 g |
| Dough | Instant / fresh yeast | 12 g / 35 g (alternatives) |
| Dough | Salt | 12 g |
| Dough | Vanilla and lemon zest | 2 teaspoons + zest of 1 lemon |
| Filling | Ground walnuts | 300 g |
| Filling | Sugar | 95 g |
| Filling | Cocoa powder | 25 g |
| Filling | Milk | 110 ml |
| Egg wash | Egg | 1 |
| Egg wash | Milk | 10 ml |
Why cozonac differs from ordinary bread
Cozonac is an enriched yeasted dough containing sugar, egg yolks, milk and butter. Flour and liquids form its basic structure, while gluten helps retain the gases produced by yeast. Sugar, fats and eggs improve flavour and texture, but make dough development and fermentation more demanding than in a simple loaf of bread.
King Arthur Baking explains the roles of flour, salt, liquid and yeast in dough, as well as how a stiffer dough often produces a denser crumb. The result therefore does not depend on the amount of yeast alone. A very sweet cozonac that has been insufficiently kneaded may rise only modestly even if more yeast has been added.
Step 1: prepare the ingredients and tins
Take the butter and eggs out of the refrigerator before starting, allowing them to reach a temperature suitable for mixing. Weigh the flour, sugar, salt and walnuts separately. Line two metal cozonac tins with baking paper or grease them thoroughly. Keep raw flour away from ready-to-eat foods.
Warm the milk only until lukewarm, around 28–32°C. If using instant yeast, it can be mixed directly into the flour, in accordance with the manufacturer’s instructions. For fresh yeast, crumble it into about 80 ml of the already measured milk, with a little sugar taken from the 150 g total, and leave it for 5–10 minutes; reserve the remaining milk for the dough. Do not double the recipe quantities.
Step 2: mix the dough before adding butter
Whisk the four egg yolks with the sugar, then add the milk, vanilla and citrus zest. Mix the flour with the instant yeast, if using it, and the salt, then pour in the liquids. If using fresh yeast, add the prepared yeast mixture as well. Work with a mixer on low speed until no dry flour remains visible and a cohesive dough begins to form.
Continue kneading for approximately 8–10 minutes on low to medium speed, or until the dough starts to become elastic; actual time depends on the mixer. Do not add flour immediately simply because the dough clings slightly to the bowl. An enriched dough is softer than a dry bread dough, and full hydration takes time.
Step 3: incorporate the butter and build elasticity
Cut the 130 g softened butter into four or five portions. Incorporate one portion at a time, waiting until it has almost completely disappeared into the dough before adding the next. Knead for a further 8–12 minutes in a mixer, pausing if the motor or dough becomes too warm. Hand-kneading may take substantially longer; follow the texture rather than the clock.
At the end, the dough should be supple, smooth, slightly glossy and capable of being gently stretched into a thin membrane between the fingers. This “windowpane test” should not be forced if the dough suddenly tears: let it relax for five minutes and check again. Excess flour added during kneading can result in a dry crumb.
Step 4: first proof — watch the volume, not the clock
Transfer the dough to a large bowl very lightly greased with oil, cover it and leave it somewhere protected from strong draughts, at about 24–27°C. For this formula, the first proof may take around 75–120 minutes, and sometimes longer. A useful guide is an evident increase in volume of about 60–90%, along with an airy texture.
If the dough is cold, fermentation slows down; if the environment is too warm, the dough may become difficult to shape and the butter may soften excessively. King Arthur Baking recommends assessing proofing by appearance, volume and the dough’s response, rather than by a fixed duration. Do not leave a dough containing eggs and milk unattended for hours in strong heat.
Step 5: make the thick walnut filling
Combine the ground walnuts with the 95 g sugar and 25 g cocoa powder. Gradually pour in the 110 ml warm milk, stirring until a smooth, spreadable paste forms. Add vanilla or rum flavouring, if desired. Let the filling reach room temperature before spreading it.
Do not put a hot filling into the dough: it will soften the butter and make shaping difficult. If the filling is watery, it may create gaps and sticky patches around the spiral after baking; if it is too dry, it will separate and may crumble when sliced. For this recipe, balance matters more than the thickness of the layer.
Step 6: divide and roll the cozonac properly
Turn the dough out onto a very lightly oiled surface, without unnecessarily pressing out the air. Divide it into four equal pieces. Roll each into a rectangle of about 20 × 30 cm, without forcing the edges. Divide the filling into four equal portions, spread one on each sheet and leave an edge of about 2 cm clear.
Roll each sheet lengthways to make a roll approximately 30 cm long, and seal the seam well. For each cozonac, gently twist two rolls together, without tightening them so much that the filling is forced out. Transfer the braid to a prepared tin, with the seams tucked inward.
Step 7: second proof in the tins
Cover the cozonac loaves loosely and leave them to rise until visibly puffy and approaching the rims of the tins. Depending on the dough and temperature, this may take roughly 45–100 minutes. Do not expect both tins to rise in exactly the same way: the thickness of the rolls, the quantity of filling and their position in the kitchen can create differences.
Using the tip of a clean finger, touch a small area of dough without breaking the surface. If the indentation springs back slowly and partly, proofing is usually close to the right point; if it springs back immediately, it needs more time. If the dough collapses when touched, it may be overproofed. King Arthur’s guide to bread proofing explains the principle behind this test, which does not replace observing the loaf as a whole.
Step 8: oven temperature and egg wash
During the final 20–30 minutes of proofing, preheat the oven to 170°C, conventional top-and-bottom heat, or about 160°C fan-assisted, adjusted for the appliance. Position a rack in the lower third or lower-middle area so that the risen cozonac does not come too close to the upper heating element. Beat the egg for the wash with approximately 10 ml milk.
Gently brush the surface of the loaves just before putting them in the oven. Do not press with the brush or pour on a thick layer of egg that can collect in the corners of the tin. For a classic appearance, a small quantity of sugar may be sprinkled on top. Do not try to speed proofing by raising the oven temperature excessively.
Step 9: baking — check the centre, not just the crust
Bake for approximately 45–55 minutes, checking colour and structure towards the end. If the top browns too quickly, loosely protect it with aluminium foil after the crust has set. Do not repeatedly open the oven door during the first 25–30 minutes. With taller tins or an oven that heats unevenly, baking may take longer than the suggested range.
For better control, insert a food thermometer into the thickest area of dough, avoiding the filling layer, and aim for a centre of around 90–94°C, together with a crumb that is no longer raw and sticky. Comparable recipes for filled, swirled sweet bread use an internal temperature check of at least 88°C: King Arthur Baking, Chocolate Babka. The range does not guarantee an identical result in every oven; check the texture as well.
Step 10: cool properly for clean slices
Leave the cozonac loaves in their tins for around 10–15 minutes, allowing them to stabilise so they can be removed without tearing the crust. Then carefully transfer them to a wire rack, so air can circulate beneath the base as well. Do not seal them in plastic while still hot: condensation can soften the crust and create unnecessary moisture.
For a well-defined spiral, wait until they have cooled completely, usually a further two to three hours, before slicing. Cutting immediately after baking can compress the still-fragile crumb and give a false impression that the dough is underbaked. Serve at room temperature, when the flavours are clear and the filling is no longer hot.
Why cozonac does not rise: seven easily confused causes
A low-volume cozonac may result from inactive yeast, ingredients that are too cold, a very high sugar quantity, excess salt, insufficient kneading, unsuitable flour or proofing that is too short. If yeast has been stored at unsuitable temperatures, it may be weakened. Conversely, dough that is too warm and overproofed can rise dramatically in the bowl, then collapse during baking.
King Arthur Baking explains the effects of temperature and yeast viability. Do not automatically correct the problem by adding a huge quantity of yeast; first check whether the flour has developed an elastic network and whether the dough has suitable conditions for fermentation.
Why sugar and butter slow the process but tenderise the crumb
In a rich dough, sugar binds some of the water and, in large quantities, can slow fermentation through its osmotic effect on yeast cells. Butter limits some of the connections in the gluten network and contributes tenderness. Milk supports flavour and browning, while egg yolks add fats and compounds with an emulsifying role.
This is why it is often recommended that the dough be partially developed before the butter is fully incorporated. King Arthur’s butter-enriched bread recipe demonstrates this working order in practice. There is no universal rule that prolonged kneading guarantees success regardless of flour type, dough temperature or liquid quantity.
What happens in the crumb during fermentation and baking
Yeast metabolises sugars and releases carbon dioxide, which is partly retained in the gluten network and makes the dough rise. During baking, the gases expand, proteins coagulate, and starch absorbs water and gelatinises. The soft structure of raw dough gradually becomes an elastic baked crumb.
On the exterior, heat and compounds in eggs, milk and sugar promote browning, including through Maillard reactions and other thermal transformations. A golden crust does not automatically mean that the centre is done, particularly where there is plenty of filling. That is why the temperature measured in the dough and baking time must be assessed together.
Common problems: likely cause and fix
When diagnosing an unsuccessful cozonac, distinguish between problems of structure, proofing, shaping and baking. A single sign, such as a cracked crust, does not necessarily indicate the same cause in every kitchen.
Use the table below as guidance, not as a final verdict. Some flaws can have two or three causes at once, and improvement requires changing one variable at a time.
| Symptom | Likely causes | What to correct next time |
|---|---|---|
| Does not rise during proofing | Weakened yeast, cold dough, too much salt or sugar | Check the yeast and temperature; monitor volume, not the clock |
| Dense crumb | Insufficient kneading or proofing that was too short | Develop elasticity more thoroughly and wait for the dough to rise |
| Collapses after baking | Overproofing, weak structure, insufficiently baked centre | Shorten the final proof and check the dough at the centre |
| Dry texture | Too much flour or overbaking | Weigh the flour, keep the dough soft and monitor baking |
| Tunnel beside the spiral | Filling too wet or rolling with gaps | Thicken the paste and roll evenly |
| Burnt on top but raw in the middle | Rack position too high or oven too hot | Move to a lower shelf, protect the crust and check the temperature |
| Spiral crumbles | Filling too dry or walnut pieces too large | Adjust the milk very slightly and grind the walnuts more finely |
| Crust cracks badly | Insufficient final proof, very tight shaping | Allow more time for the second proof |
Three filling variations without losing the proportions
For a poppy-seed version, prepare the filling separately, with ground or scalded poppy seeds according to a specific recipe, sugar and liquid adjusted to a paste-like consistency. For a version with rahat — Romanian-style fruit-flavoured confectionery — use small, evenly distributed pieces without adding an overly wet paste. For a raisin version, drain and dry the raisins before shaping.
Do not treat these variations as one-to-one gram substitutions for the walnut mixture: liquid absorption and filling weight change. If making a product without walnuts, also consider the risk of cross-contamination, especially for people with allergies. Allergen information matters when cozonac is offered to others.
For more ideas using Romanian ingredients, see InfoBuz’s selection of traditional Romanian desserts. To better understand working with simple dough and how it differs from enriched dough, also see our guide to homemade bread.
How to keep cozonac soft without encouraging moisture
Let the cozonac cool completely, then wrap it well and keep it in a clean, cool, dry place. For this version without fresh cream added after baking, aim to eat it within around two to three days at a temperate room temperature; if the kitchen is very warm or humid, freeze leftover portions sooner. Do not keep the product if mould, an abnormal smell or an abnormal texture appears.
For longer storage, freeze individually wrapped slices, ideally once completely cool; for quality, eat them within around two to three months. King Arthur Baking explains why ordinary refrigeration can speed up bread staling, even though lower temperatures slow mould growth. Fillings containing cream, cheese or other perishable ingredients have different storage requirements.
Safety rules when working with eggs, milk and raw flour
Flour is a raw food and may carry microorganisms; raw eggs can also present risks. Do not taste uncooked dough or give children pieces of raw dough to “test”. Wash hands and utensils, keep raw ingredients separate from ready-to-eat foods, and check the appearance and use-by date of products.
The CDC and the FDA recommend not consuming products containing raw flour and eggs. Also avoid tasting filling with raw ingredients that have been contaminated by utensils used for the dough. Cooling, packaging and storage are as important as the finished loaf’s appearance.
Hand-kneaded versus mixer-kneaded cozonac: what changes
A stand mixer with a dough hook can develop gluten more evenly, but some machines overheat dense doughs when used at high speed. Hand-kneading offers good feedback on elasticity, but requires more time and a few rests to allow the dough to relax. In either case, the goal is not to “beat” the dough as hard as possible.
Stop when the dough becomes elastic, even and capable of retaining gas. If it becomes too warm, give it a rest at the temperature of a cool room. If it is sticky but gradually pulls away from the bowl during kneading, do not try to turn it into a dry ball merely to make it easier to handle.
Checklist before switching on the oven
Check that the tins are prepared; the filling is cool and thick; the braids have sealed seams; the second proof is sufficient; the oven has reached the selected temperature; the rack is correctly positioned; and foil to protect the crust and, if possible, a food thermometer are ready.
Do not rely only on the golden surface: a large cozonac may look perfect outside while remaining insufficiently baked inside. Baking must be completed before cooling begins. For the next attempt, note the actual temperature, duration and how much the dough rose — these observations are more useful than randomly changing five ingredients.
Frequently asked questions about fluffy cozonac
What flour should I choose? White flour with good gluten-forming capacity is suitable; protein percentage is a guide, not the only criterion. Can I use fresh yeast? Yes: the formula suggests about 35 g fresh yeast instead of 12 g instant yeast. Why does it not rise well? Check the yeast, temperature, kneading and actual proofing time. Why does the filling separate? The paste may be too dry, or the sheet may not have been rolled firmly enough.
Why does it burn on top? It may be too close to the heating element; loosely cover it after the crust has set and check the oven temperature. Can I make the dough the evening before? It is possible through controlled refrigerator fermentation, but timings and yeast must be recalibrated; do not leave a dough containing eggs and milk overnight in warmth. When should I cut the cozonac? Once it has cooled completely. Is cozonac suitable for people with allergies? This recipe contains wheat, milk, eggs and walnuts.
Sources, checks and editorial notes
For yeast behaviour and proofing technique: King Arthur Baking – Yeast Baking Guide and What is proofing bread?. For the order in which butter is incorporated: Butter-Enriched Bread. For comparison of centre temperatures in a filled sweet dough: Chocolate Babka.
For raw-flour and raw-egg safety: CDC – Raw Flour and Dough and FDA – Handling Flour Safely. For storing yeasted bread: King Arthur – The best way to store yeast bread. The formula with the quantities above is an editorial recipe proposal for two tins that has not been validated through an InfoBuz kitchen test; times and results depend on the flour, equipment, quantity of filling and temperature. Editorial review: 22 November 2026.





Discuția cititorilor
Ai o opinie sau o întrebare despre acest articol? Spune-ne ce crezi.
Fii primul care deschide discuția.
Te rugăm să păstrezi un limbaj civilizat și să discuți la subiect. Comentariile spam sunt filtrate automat.