
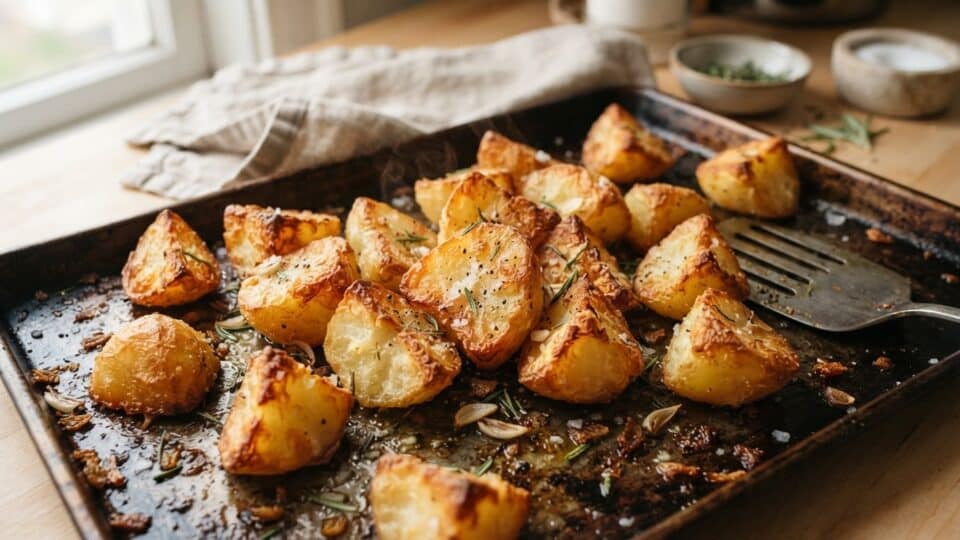
Crispy roast potatoes with a fluffy centre are most reliably achieved by not putting them into the roasting tray raw. The key is a brief parboil, a little baking soda in the water, proper drying and shaking the potatoes before roasting, so their surface becomes rough and develops a golden crust.
In the same vein, see Focaccia with 48 hours of cold fermentation: an 80% hydration recipe with a crisp crust and airy crumb, which offers further relevant information.
The recipe below makes 4–6 servings and uses simple ingredients. You do not need flour, added starch or deep-frying.
Crispy roast potatoes: ingredients
- 1.5 kg potatoes;
- 2.5–3 litres water;
- 1 tablespoon salt for the cooking water;
- ½ teaspoon baking soda;
- 50–60 ml olive oil or sunflower oil;
- 1 teaspoon fine salt, to finish;
- ½ teaspoon black pepper;
- 1 teaspoon granulated garlic, optional;
- 1 teaspoon sweet or smoked paprika, optional;
- rosemary or thyme, optional.
Which potatoes work best?
For a fluffy interior and a thick crust, look for higher-starch potatoes intended for baking or mashing.
If the packaging includes a usage classification, potatoes described as suitable for the following are generally appropriate:
- baking;
- mashing;
- frying;
- dishes where a floury texture is wanted.
Very waxy potatoes, intended chiefly for salads, hold their shape well but are less likely to develop that airy, fluffy centre.
Why cut them into relatively large pieces?
Cut the potatoes into pieces of around 4–5 cm.
If they are too small:
- they can dry out before developing a crust;
- the crust-to-centre ratio becomes too high;
- they break more easily when shaken.
If they are too large, roasting takes longer and even browning may be harder to achieve.
Step 1: Preheat the oven well in advance
Set the oven to:
- 220°C conventional heat;
- or around 200–210°C with fan assistance.
Put the empty roasting tray in the oven for the final 10–15 minutes of preheating.
A hot tray helps the potatoes begin browning as soon as they touch its surface.
Step 2: Boil the water with salt and baking soda
Bring the water to the boil in a large pot.
Add the salt and about half a teaspoon of baking soda.
The baking soda makes the water slightly more alkaline and helps break down the potato’s outer layer.
This produces exactly what is needed: a softer, starchier surface that becomes rough when shaken.
Why baking soda helps create a crust
It is not used for flavour.
The quantity is small, and its role is technical.
In a slightly alkaline environment, the potato’s surface breaks down faster. When the pieces are shaken after boiling, an uneven film of starch forms.
In the oven, this film dries and browns, producing a thicker crust than a raw potato placed directly in the tray.
Step 3: Add the potatoes to the boiling water
Add the cut potatoes to the water and wait for it to return to the boil.
Boil them for around 8–10 minutes, depending on the variety and size.
They should not be completely soft.
They are ready for the next stage when:
- the outside has begun to soften;
- the corners are slightly fragile;
- a fork goes in a little way, while the centre still offers resistance.
Step 4: Drain them very well
Drain the potatoes in a large colander.
Leave them for 2–3 minutes to allow the steam to escape.
This step matters.
Surface water needs to be removed before the oil is added; otherwise, the potatoes will cook more by steaming than by browning.
Step 5: Shake the potatoes
Transfer them to a pot or large bowl.
Cover and shake the container a few times, without being too vigorous.
You will notice that the surface is no longer perfectly smooth.
The corners will wear away, forming an irregular, floury outer layer.
This is one of the main secrets to a crisp crust.
How they should look before roasting
A perfectly prepared potato should not look glossy and smooth.
It should look almost shaggy, with slightly ragged edges.
The more irregular surface you create, the more areas there are that will brown.
Step 6: Add the oil
Pour 50–60 ml of oil over the potatoes.
Toss carefully so every piece is covered with a thin coating.
They do not need to be swimming in oil.
The aim is to coat the surface, not fry them.
Which oil is suitable?
You can use:
- olive oil;
- sunflower oil;
- rapeseed oil;
- duck fat, for a particularly rich version;
- lard, in moderation, if you want a traditional flavour.
For an everyday side dish, a neutral vegetable oil works very well.
Step 7: Put the potatoes on the hot tray
Carefully take the tray out of the oven.
Spread the potatoes in a single layer.
Leave space between the pieces.
If you crowd them:
- steam remains trapped between them;
- the local temperature falls;
- they cook but brown more slowly.
Do not use a tray that is too small
For 1.5 kg of potatoes, it is better to use two trays than crowd everything onto one.
The crust needs hot air and contact with a hot surface.
Step 8: Roast without turning them straight away
Put the tray in the oven and leave the potatoes for around 20–25 minutes without moving them.
At this stage, the side in contact with the tray forms its first firm crust.
If you turn them after five minutes, you risk pulling away the very layer you are trying to build.
Step 9: Turn and continue roasting
After the first 20–25 minutes, turn the potatoes with a spatula.
Roast for a further 20–30 minutes.
Depending on the oven, total cooking time will be around 45–55 minutes.
Halfway through this second stage, you can turn them once more if you want even browning on several sides.
The right colour: deep golden, not very dark brown
The potatoes should be thoroughly browned, but not burnt.
The FDA and the European Commission explain that acrylamide can form in starchy foods cooked at high temperatures. Very dark areas tend to contain more acrylamide.
A good target at home is golden to golden-brown, rather than very dark brown.
For further information, see the FDA’s guidance on potatoes and acrylamide and the European Commission’s information on acrylamide in food.
When to add garlic and herbs
Fresh chopped garlic can burn if it is added from the start at 220°C.
There are two better options:
Option 1: Granulated garlic
You can add it before roasting, in moderation.
Option 2: Fresh garlic
Add it in the final 5–10 minutes, or mix it with oil and herbs after the potatoes come out of the oven.
Rosemary: before or after?
Whole sprigs can be added to the tray during the second half of roasting.
If using very finely chopped rosemary, it is safer to add it towards the end so it does not burn.
Why potatoes roasted raw are less fluffy
The “cut, oil and roast” method works, but it usually produces a thinner crust and a denser interior.
Parboiling does two things at once:
- it begins gelatinising the starch on the outside;
- it partially cooks the interior.
As a result, the oven is mainly responsible for drying and browning, rather than cooking the whole potato from scratch.
Why they should not be boiled for too long
If they are fully cooked before going into the oven, they may break apart when shaken.
Some broken edges are excellent for the crust, but you do not want to turn half the pot into mashed potato.
Ideally, the outside should be soft while the centre remains firm.
Mistake No. 1: A cold tray
A cold tray slows browning in the first few minutes.
Preheating it helps the outer layer start losing moisture and browning immediately.
Mistake No. 2: Too much water on the surface
If you drain the potatoes and put them straight into the tray, the remaining water creates steam.
Leave them to dry for a few minutes.
Mistake No. 3: Too little space between the potatoes
A crowded tray acts like a humid environment.
Use a large tray or divide the quantity between two.
Mistake No. 4: Turning them too often
Allow the first crust to form before moving them.
Turning them becomes much easier afterwards.
Mistake No. 5: Seasonings that burn
Paprika, fresh garlic and very finely chopped herbs can turn bitter if exposed to high heat for too long.
For a strong, clean flavour, some seasonings can be added towards the end.
Can you make the potatoes without baking soda?
Yes.
The method also works without baking soda.
The difference is that the surface will remain somewhat smoother, and you may get a slightly finer crust.
If you do not have baking soda, boil the potatoes normally and shake them a little more vigorously after draining.
Can you use starch?
You can sprinkle on a very small amount of cornflour or potato starch, but it is not necessary if the parboiling has been done correctly.
The natural starch released by the potato is enough for a very good crust.
Potatoes with or without the skin?
Both options work.
Without the skin, you get a more even crust and more floury surface area.
With the skin on, you get a rustic look and less preparation.
If you leave the skin on, wash the potatoes very thoroughly before cutting them.
Can you prepare the potatoes in advance?
Yes.
You can partially boil them, drain them and leave them to cool.
Then keep them in a covered container in the refrigerator and roast them later.
Before putting them in the oven, make sure they are dry on the surface.
How to reheat them without making them soft
Do not use a microwave if you want to preserve the crust.
Reheat them for 10–15 minutes at 200°C in an already hot oven or in an air fryer.
The surface will recover much better.
Can they be made in an air fryer?
Yes, but in smaller quantities.
After parboiling and shaking, put the potatoes in a single layer in the basket.
Cook them at around 190–200°C, shaking the basket a few times.
Cooking time depends greatly on the model and quantity.
Which sauce goes best?
The potatoes are good on their own, but go particularly well with:
- yogurt and garlic sauce;
- tzatziki;
- garlic mayonnaise;
- cheese sauce;
- honey mustard;
- yogurt and lemon sauce.
For a similar option using a different technique, see InfoBuz’s recipe for crispy smashed roast potatoes with yogurt and lemon sauce.
What to serve them with
They work well alongside:
- roast chicken;
- pork;
- beef;
- fish;
- grilled vegetables;
- burgers;
- eggs;
- salads.
If you prepare meals in advance, you can also use this method in the ideas in InfoBuz’s Cook Once, Eat for Three Days guide.
The recipe at a glance
| Step | What to do |
|---|---|
| 1 | Preheat the oven to 220°C, with the tray inside. |
| 2 | Boil the water with salt and ½ teaspoon baking soda. |
| 3 | Boil the potatoes for 8–10 minutes. |
| 4 | Drain them and leave them to dry for 2–3 minutes. |
| 5 | Shake them until rough on the outside. |
| 6 | Add the oil and suitable seasonings. |
| 7 | Spread them on the hot tray. |
| 8 | Roast for 20–25 minutes without moving them. |
| 9 | Turn them and roast for a further 20–30 minutes. |
Crispy roast potatoes: the key points
If you want a substantial crust and a fluffy interior, oven temperature is not the only factor.
The sequence is essential:
parboil → drain → shake → oil → hot tray → space → enough time without moving them.
Baking soda helps, but it is not the only secret. The biggest differences come from how thoroughly you dry the potatoes and how much rough surface you create before roasting.
Frequently asked questions
Why are my roast potatoes not crispy?
The most common causes are an overcrowded tray, potatoes that are too wet, an insufficiently preheated oven and the lack of a rough potato surface.
What temperature should they be roasted at?
About 220°C with conventional heat or 200–210°C with fan assistance, depending on the oven.
Why add baking soda to the cooking water?
It softens the outer layer faster and creates a starch-rich surface that becomes crisp during roasting.
How long should they be boiled before roasting?
About 8–10 minutes for 4–5 cm pieces, until the outside is soft but the centre remains firm.
Can they be made without oil?
They can be roasted with very little oil, but the crust will usually be less even and less rich. A thin coating of oil helps considerably with browning and texture.


Discuția cititorilor
Ai o opinie sau o întrebare despre acest articol? Spune-ne ce crezi.
Fii primul care deschide discuția.
Te rugăm să păstrezi un limbaj civilizat și să discuți la subiect. Comentariile spam sunt filtrate automat.